 Mastering Chain
Guide
Every screen and every button, and how to use them to master a song on your iPhone. The screenshots show Midnight, the look Mastering Chain starts with; Console and Tape draw the same controls their own way.
Quick start
Master a song on your iPhone
Save your mix to Files, or AirDrop it to your iPhone: a WAV or AIFF from your DAW, mono or stereo, up to 15 minutes. An MP3 or M4A opens too.
Tap Import track and pick it. The first time, start the 3-day free trial from the banner above the chain.
Tap play and turn Loop on.
Shape the tone with the EQ, then glue the mix with the bus compressor.
Raise the limiter's Gain until the track is as loud as you want, with the clipper taking the sharpest peaks off first. Leave the ceiling at −1 dBTP.
Turn Match on and switch each block in and out: you hear what it does at the same loudness. Compare plays your mix against the master.
Press Reset on the meter and play the whole track for its integrated loudness.
Tap Export track, choose WAV 24-bit and tap Export, then Share the master to Files or AirDrop.
Check a mix in the car
Connect your iPhone to the car over CarPlay or a cable, and park.
Load the mix, turn Loop on and play it as loud as you'd drive with it.
Where the kick and bass boom or vanish, fix the low end with the EQ's low shelf and bells.
Turn Match on and switch the EQ in and out to hear the change at the same loudness.
Tap Recipe for your DAW and send it to your computer: the EQ moves are in it as numbers.
Check it on the phone speaker and AirPods
Play the master on the iPhone's speaker with Mono on: the kick, bass and vocal should still come through.
On AirPods, check the balance, the vocal and the stereo image. Judge the top end and the timing on wired headphones: Bluetooth arrives late and compressed.
Check the loudness before you upload
Switch the meter to Integrated, press Reset and play the whole track from the start.
At the end, read the integrated loudness and the max true peak. Streaming services turn louder tracks down, so there's no need to go louder than the music wants.
Export, and read the summary: it measures the file itself, with the true peak after MP3 or AAC encoding.
Rebuild the master in your DAW
Tap Recipe for your DAW and wait while it measures the whole track.
Tap Share and send the recipe to your computer.
Dial the values into your EQ, compressor, clipper and limiter, in the same order.
Fine-tune the compressor's threshold and the limiter's gain until the gain reduction reads as in the recipe, then check your loudness and true peak against its Result.
The main screen
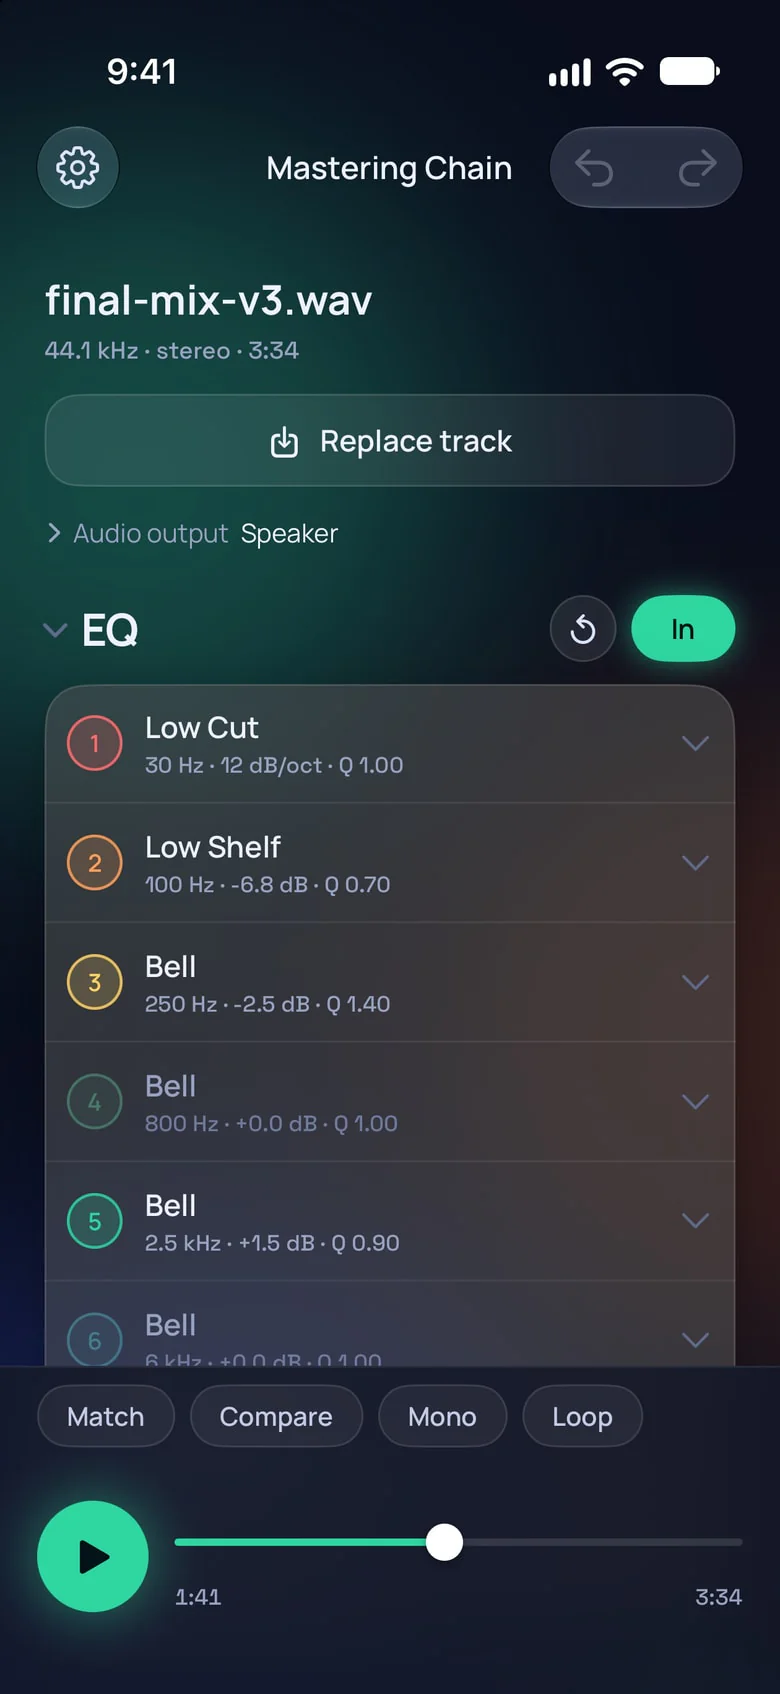
One screen holds the whole master, top to bottom: the track, the EQ, the bus compressor, the clipper and the limiter, then the meter, Export track and Recipe for your DAW. The bar with play and the listening modes stays at the bottom while you scroll.
Mastering Chain keeps the track, where you paused and every setting, and opens where you left off.
Settings. The full version, the look, the version and this guide.
Undo and Redo. Step back and forth through your changes to the chain. A whole slider drag is one step, and so is a Reset. The listening modes and the track aren't part of it, as in a DAW.
The track. Its name, sample rate, mono or stereo, and length.
Replace track. Opens Files to load another track; it says Import track while there's none. While a track decodes, Cancel stops it. The chain keeps its settings, so the next song goes through the same master.
Audio output. Where the sound goes: the speaker, headphones or the car. Tap it for the sample rate, the buffer and the output latency.
A block's name. Tap it to fold the block away. Folded, it says what the block is doing: how many EQ bands are on, the compressor's and the limiter's gain reduction, the clipper's clipping.
Reset. Every control of the block back to its default; the block stays in or out. It shows while the block is open.
In. Switches the block in or out. Touching any of its controls switches it in, so you always hear a change.
Listening modes. Match, Compare, Mono and Loop: see Listening.
Play. Plays and pauses. The track keeps playing in the background and with the screen locked; play and pause it from the lock screen or your headphones too.
Position. Tap the bar to jump there, or drag along it and let go.
Sliders and values
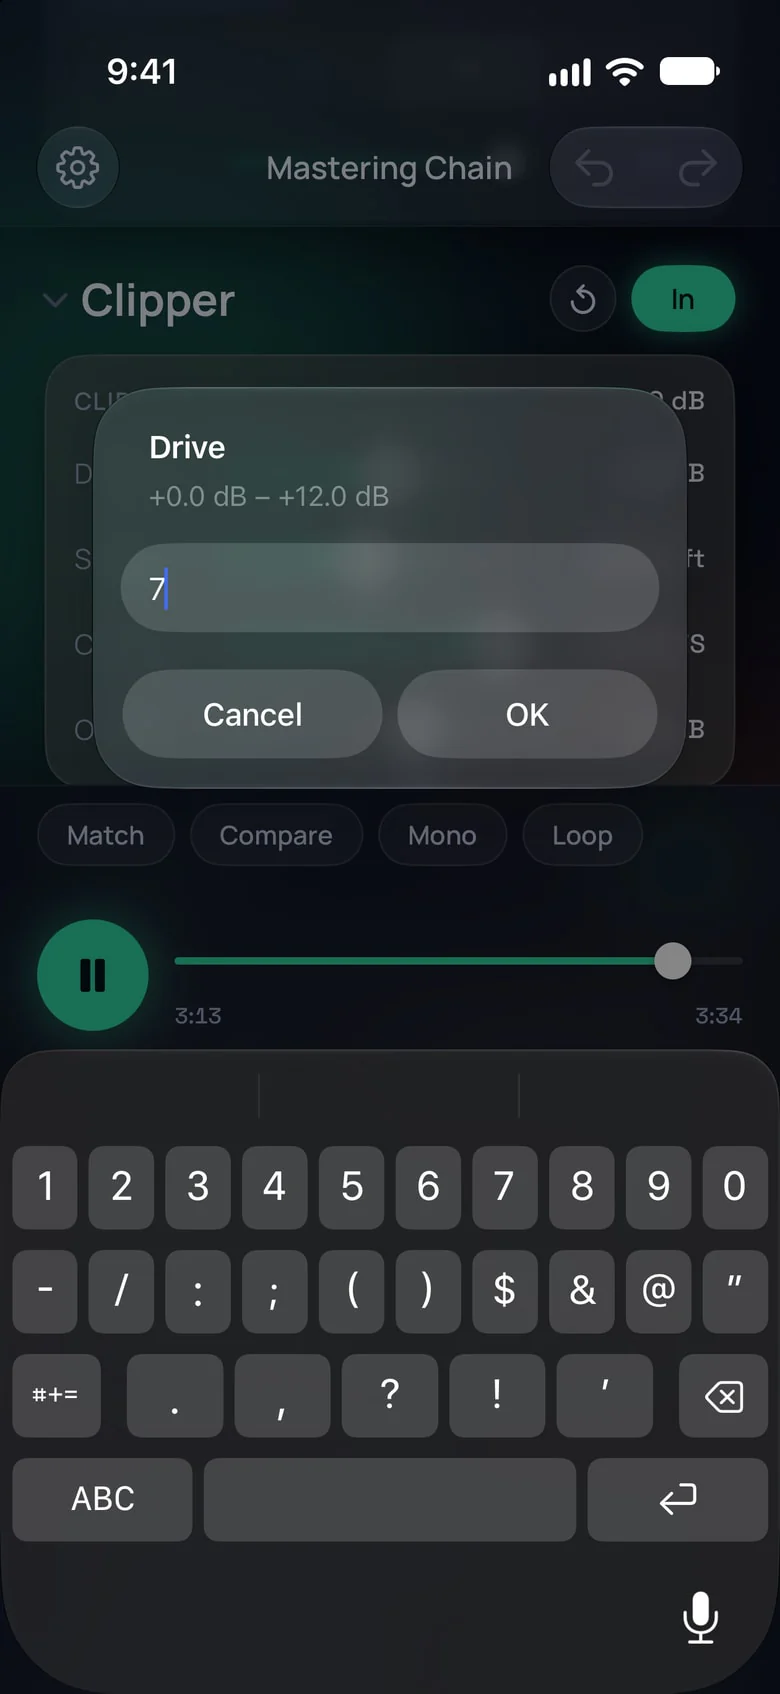
Drag a slider and hear the change as you go: the whole drag is one Undo step. Every slider has its value on the right.
Tap a value to type it. The box shows the range, and a number past either end is set to that end. Type 2.5k for 2.5 kHz, a + or a −, with a point or a comma.
Choices such as the EQ's shape, the compressor's ratio or the limiter's style are buttons: tap one.
The EQ
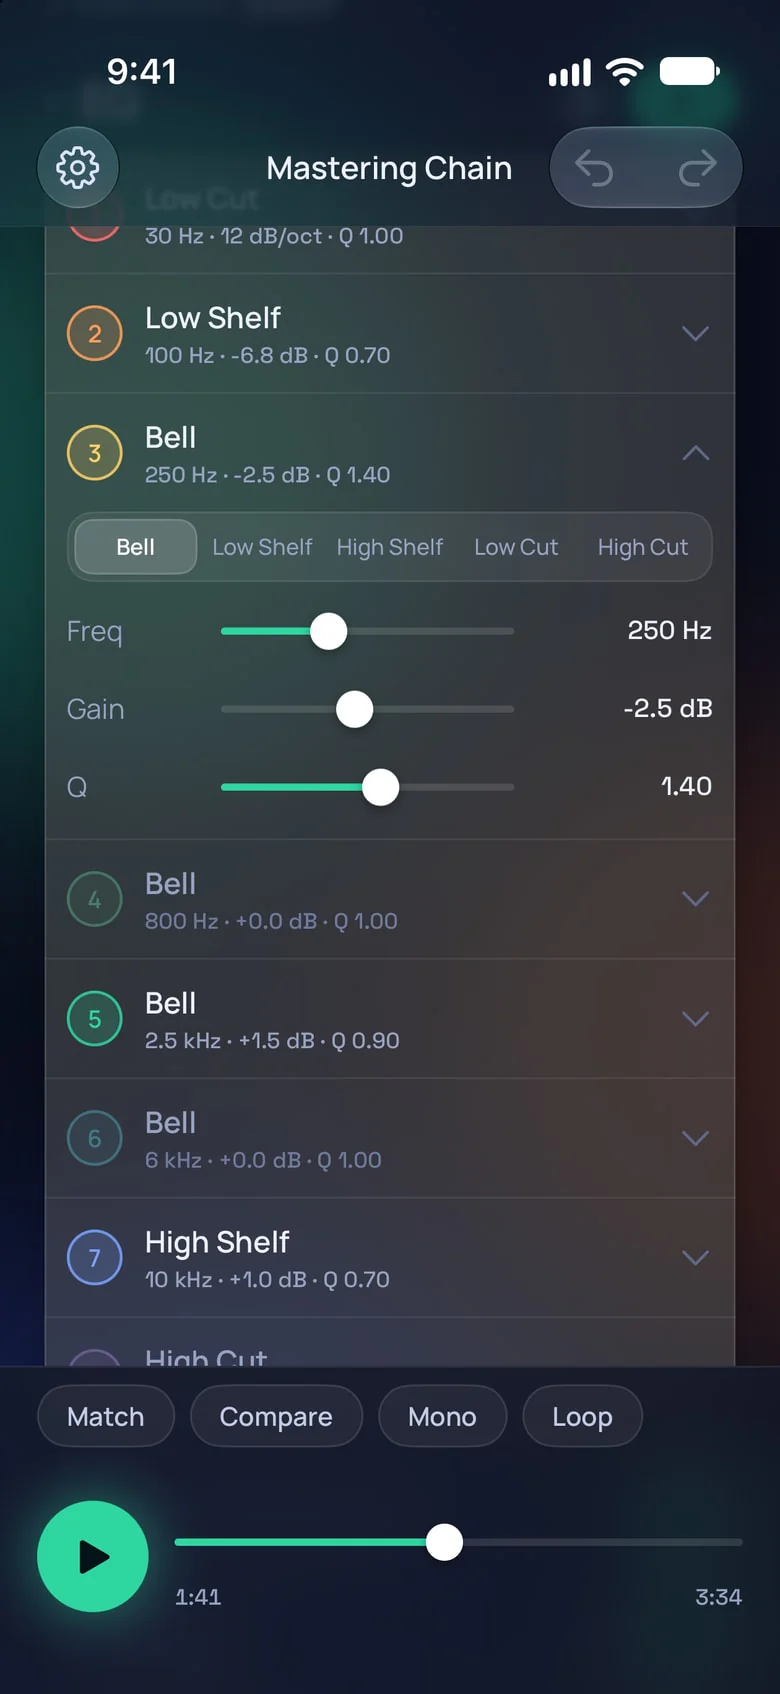
Eight bands, each off to start with: a low cut at 30 Hz, a low shelf at 100 Hz, bells at 250 Hz, 800 Hz, 2.5 kHz and 6 kHz, a high shelf at 10 kHz and a high cut at 18 kHz. Switch on the ones you need; any band can take any shape. One band is open at a time.
A band. Tap its number to switch it on or off, the rest of the row to open its controls. Under its name are its frequency, gain and Q.
Shape. Bell, Low Shelf, High Shelf, Low Cut or High Cut. A cut has no Gain; it has a Slope instead: 12, 24 or 48 dB/oct.
Freq. 20 Hz to 20 kHz. The slider moves evenly by octaves.
The value. Tap it to type a number: see Sliders and values.
Gain. −30 to +30 dB, for bells and shelves.
Q. 0.025 to 40. The higher, the narrower a bell and the sharper the corner of a shelf or a cut.
A band that's off. Dimmed. Moving any of its controls switches it on.
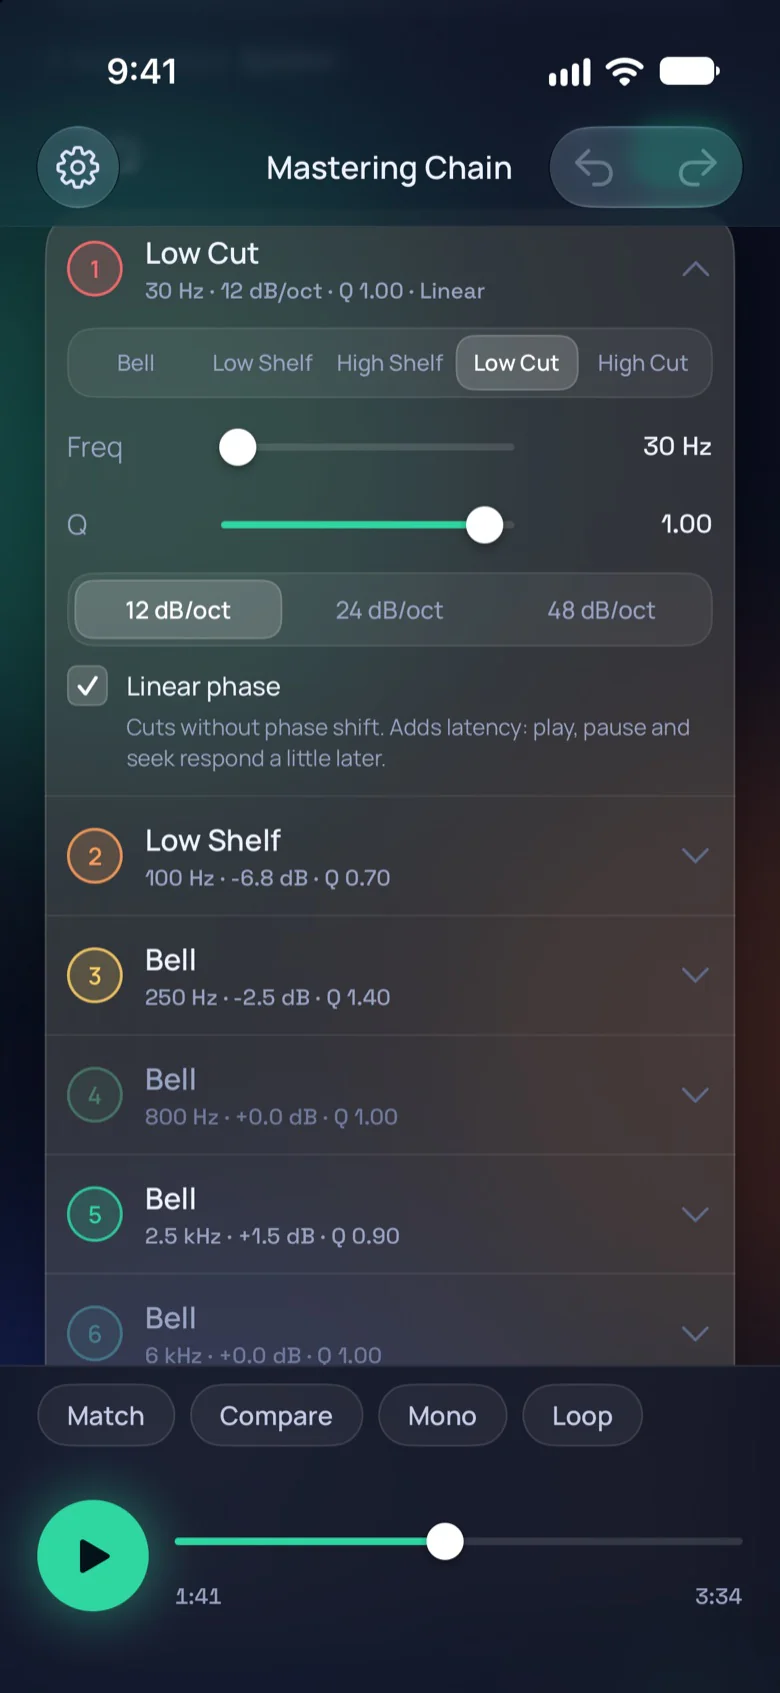
Linear phase. A low cut takes out rumble you don't hear but the limiter still reacts to. The usual cut, in minimum phase, shifts the phase of the low end, and under a heavy 808 or bass the peaks can grow by up to a few dB. You can tick Linear phase to cut the same lows without the shift.
A cut. A low or high cut has a Slope instead of Gain. “Linear” after its values means the cut runs in linear phase.
Slope. 12, 24 or 48 dB/oct: how steeply the cut falls beyond its frequency.
Linear phase. Low Cut only, off to start with. Ticked, the cut works without phase shift: it barely moves the bass peaks, so the limiter doesn't have to work harder. It adds latency: play, pause and seek respond a little later. Its Q goes up to 1.5, or 1 at 48 dB/oct.
The bus compressor
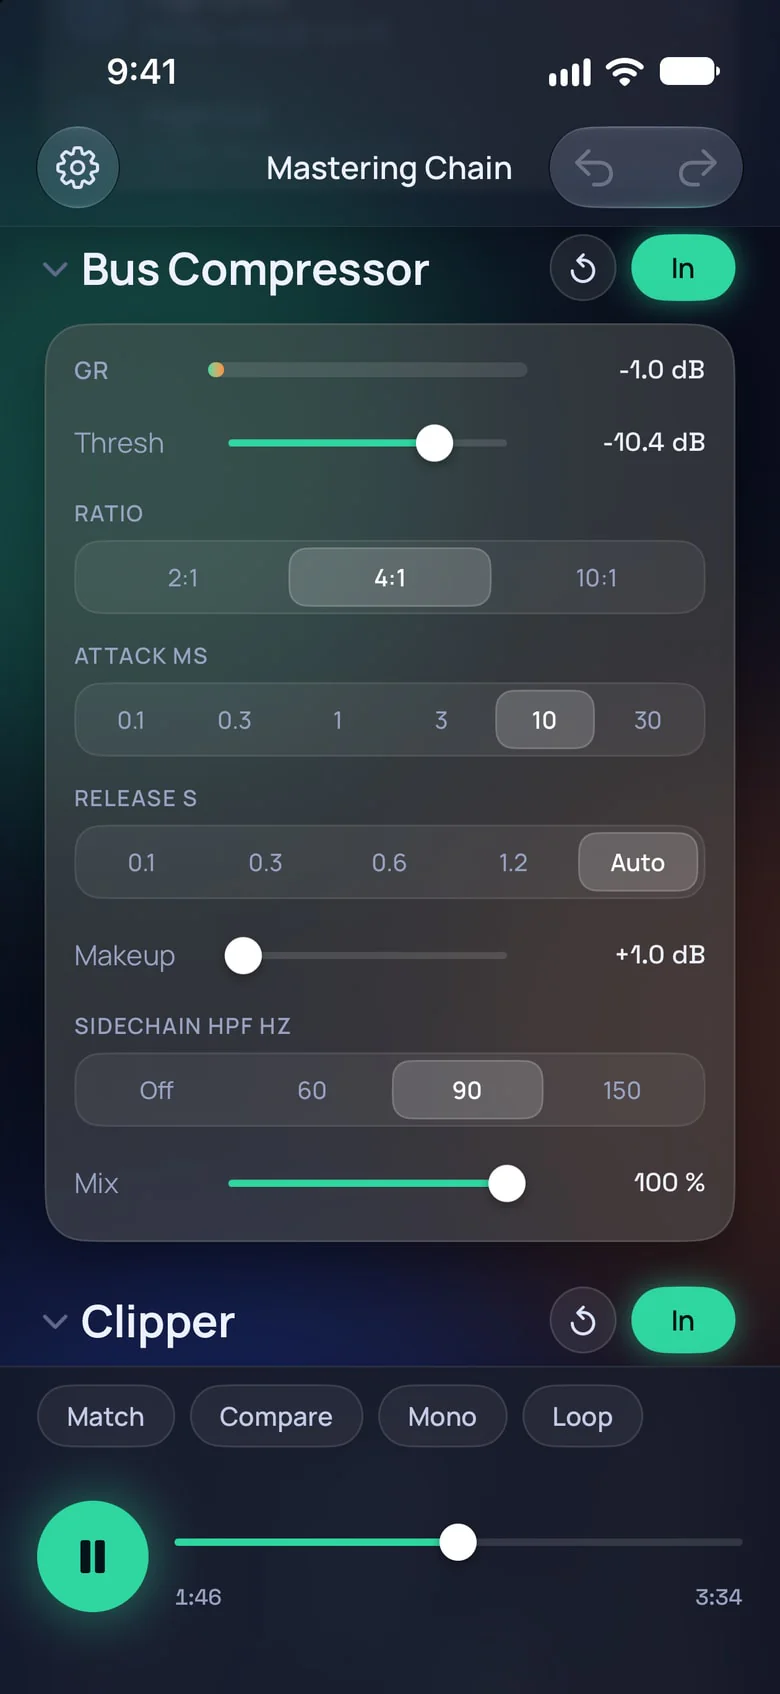
Glue for the whole mix: it turns the loudest moments down a little, so the track holds together. Its ratio, attack and release come in steps, as on a classic bus compressor.
GR. Gain reduction: how much the compressor is turning the track down right now.
Thresh. −40 to 0 dB: where it starts to work. The lower it is, the more it compresses.
Ratio. 2:1, 4:1 or 10:1: how hard it turns down what goes over the threshold.
Attack. 0.1 to 30 ms: how fast it reacts. A slower attack lets the hits of the drums through.
Release. 0.1 to 1.2 seconds, or Auto, which follows the music: how fast it lets go.
Makeup. 0 to +20 dB after the compression, to win back the level it took.
Sidechain HPF. Off, 60, 90 or 150 Hz: the compressor stops hearing the lows below it, so the kick and bass don't make the whole mix pump.
Mix. 0 to 100%: how much of the compressed sound you hear. Under 100%, the rest is the track as it came in: parallel compression.
The clipper
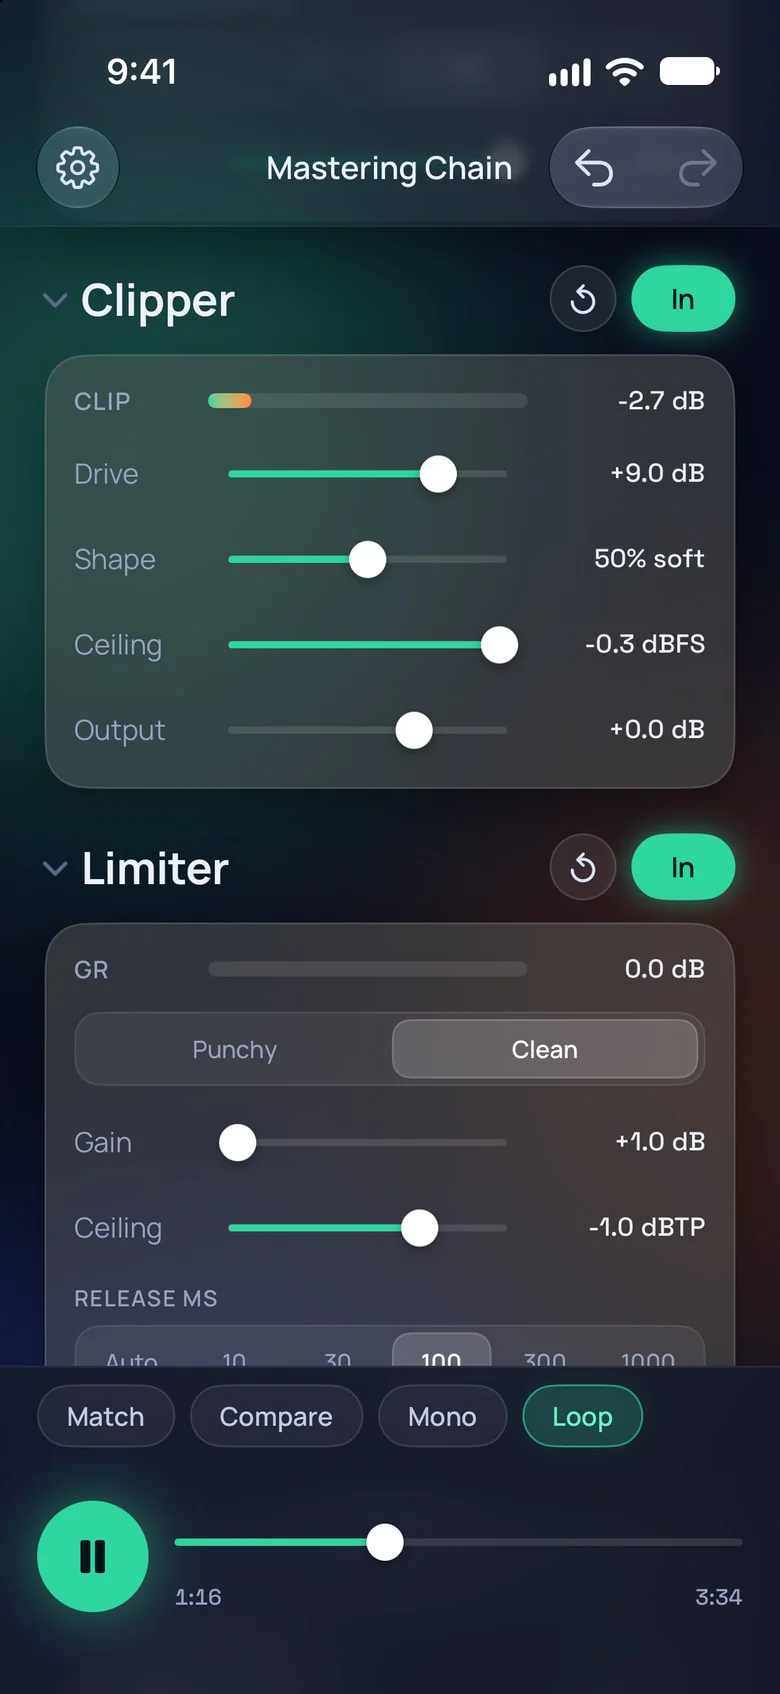
The clipper shaves the sharpest peaks off before the limiter, so the master gets louder at the same true peak. It runs 8× oversampled.
Clip. How much it's shaving off the peaks right now.
Drive. 0 to +12 dB into the clipper. The more drive, the more it clips.
Shape. From Hard to Soft. Hard cuts the peaks flat at the ceiling; Soft rounds them off on the way, which sounds smoother; in between, a percentage of soft.
Ceiling. −12 to 0 dBFS: the level it clips at.
Output. −12 to +6 dB after the clipper: the level the limiter gets.
The limiter
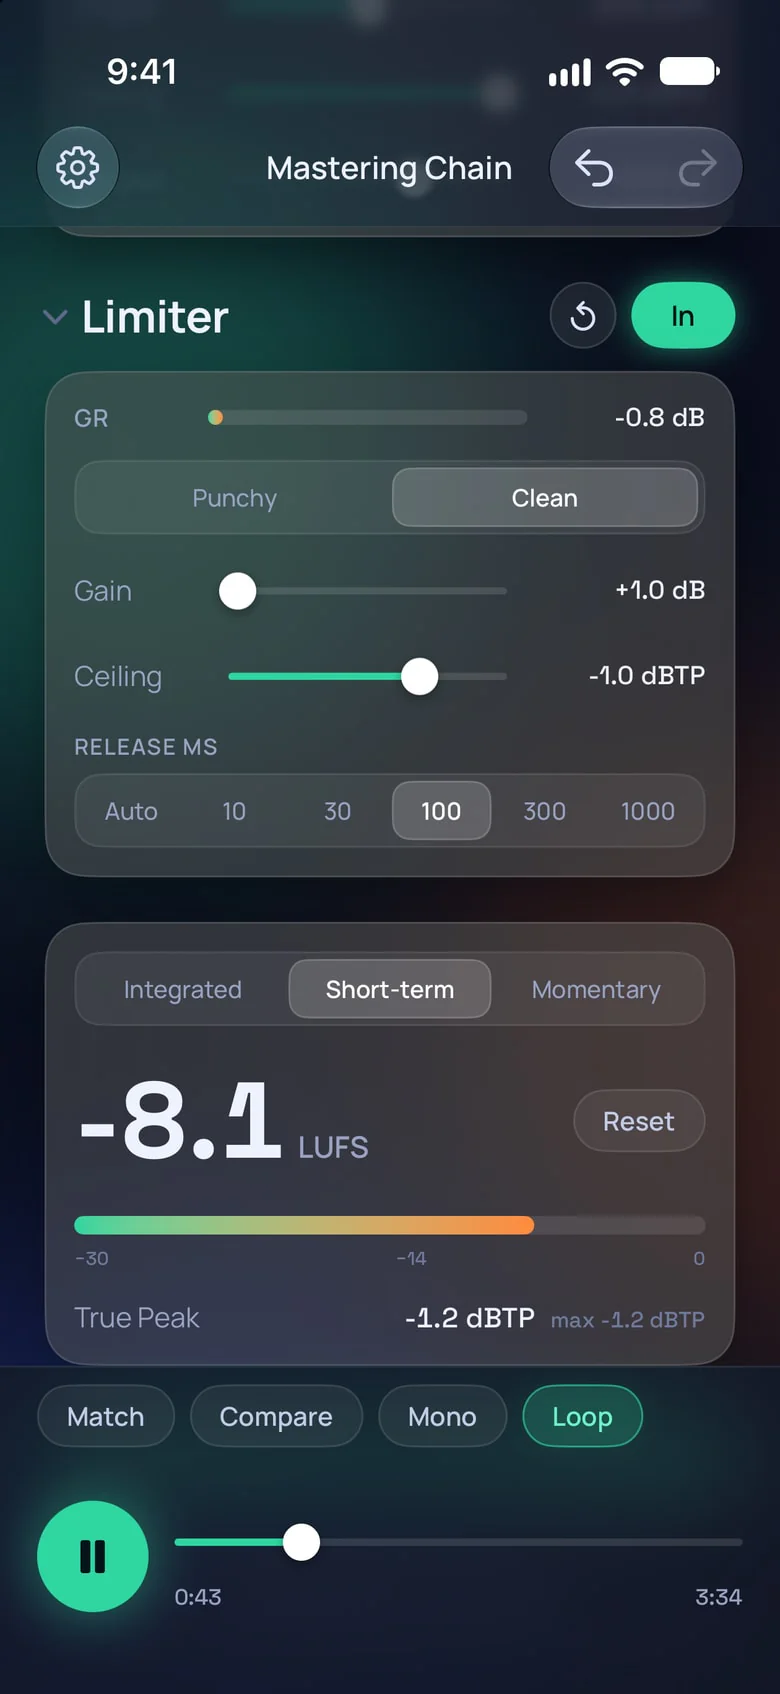
The last block: it brings the master up to loudness and keeps its true peak under the ceiling, with 8× peak detection. Its gain is where you set how loud the master is.
GR. How much the limiter is turning the track down right now.
Punchy or Clean. Punchy turns down just ahead of each hit and holds sustained bass steady. Clean doesn't ramp ahead, and sounds louder and more open.
Gain. 0 to +30 dB into the limiter: how loud the master is. The more gain, the more it limits.
Ceiling. −3 to −0.1 dBTP, −1 to start with: the true peak the master doesn't go over. An MP3 or AAC can still go over it: see Export.
Release. Auto, or 10 to 1000 ms: how fast it lets go. Auto follows the music.
The order of the chain
Mastering Chain runs the mastering chain in the order engineers use: EQ, bus compressor, clipper, then the limiter, with the meter reading the end of it.
- EQ first, so the compressor reacts to the balance you set, not to a boom you're about to cut.
- The bus compressor next, to glue the mix before anything touches its peaks.
- The clipper before the limiter. It cuts the sharpest peaks off at once, so the limiter has less to catch and pumps less. Together they make a master louder than the limiter alone would at the same true peak.
- The limiter last, so nothing after it can push the peaks back up, and its ceiling holds. Only encoding to MP3 or AAC can: see Export.
The LUFS meter
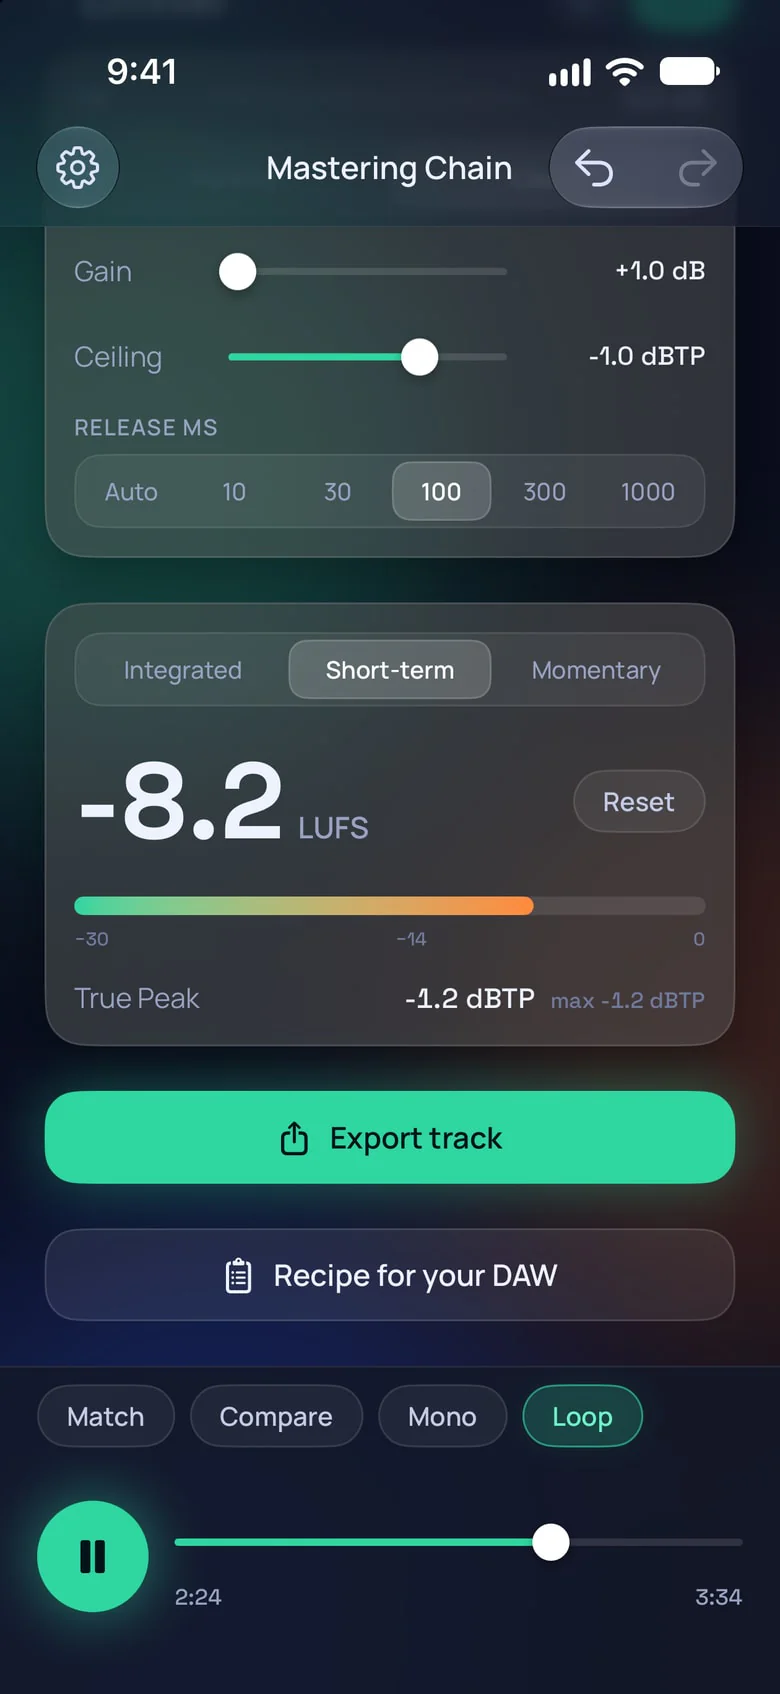
The meter reads the master at the end of the chain, the way a DAW's loudness meter does. While Compare plays your mix, it reads the mix instead, at its own loudness, so you can see how much the master adds. Mono and your iPhone's volume don't change it.
Integrated, Short-term, Momentary. Integrated is the loudness of everything since Reset, the number streaming services go by. Short-term is the last 3 seconds, Momentary the last 0.4 second.
Loudness. In LUFS. A dash until there's enough audio to measure.
Reset. Starts Integrated and the maximum true peak over. Reset, then play the whole track for its integrated loudness.
The bar. −30 to 0 LUFS, with −14 marked: about where Spotify and YouTube turn louder tracks down to. Tape shows a needle instead, and System, Light and Dark just the number.
True Peak. The highest true peak of the last 3 seconds, then max: the highest since Reset. Both turn red over 0 dBTP.
Export track. See Export.
Recipe for your DAW. See The recipe.
How loud for Spotify? Streaming services turn loud masters down: Spotify, by default, and YouTube to about −14 LUFS, Apple Music to about −16 LUFS with Sound Check on. Spotify recommends a true peak of −1 dBTP or lower, −2 dBTP for masters louder than −14 LUFS. So a −8 LUFS master is simply played about 6 dB quieter: master as loud as the music wants, and keep the peaks under the ceiling.
True peak counts the peaks between the samples too, as a player rebuilds the wave, so it can read higher than the samples themselves. It's the peak that can distort on playback.
If the meter ever says it missed some audio, press Reset: until then its reading may be off.
Listening: Match, Compare, Mono, Loop
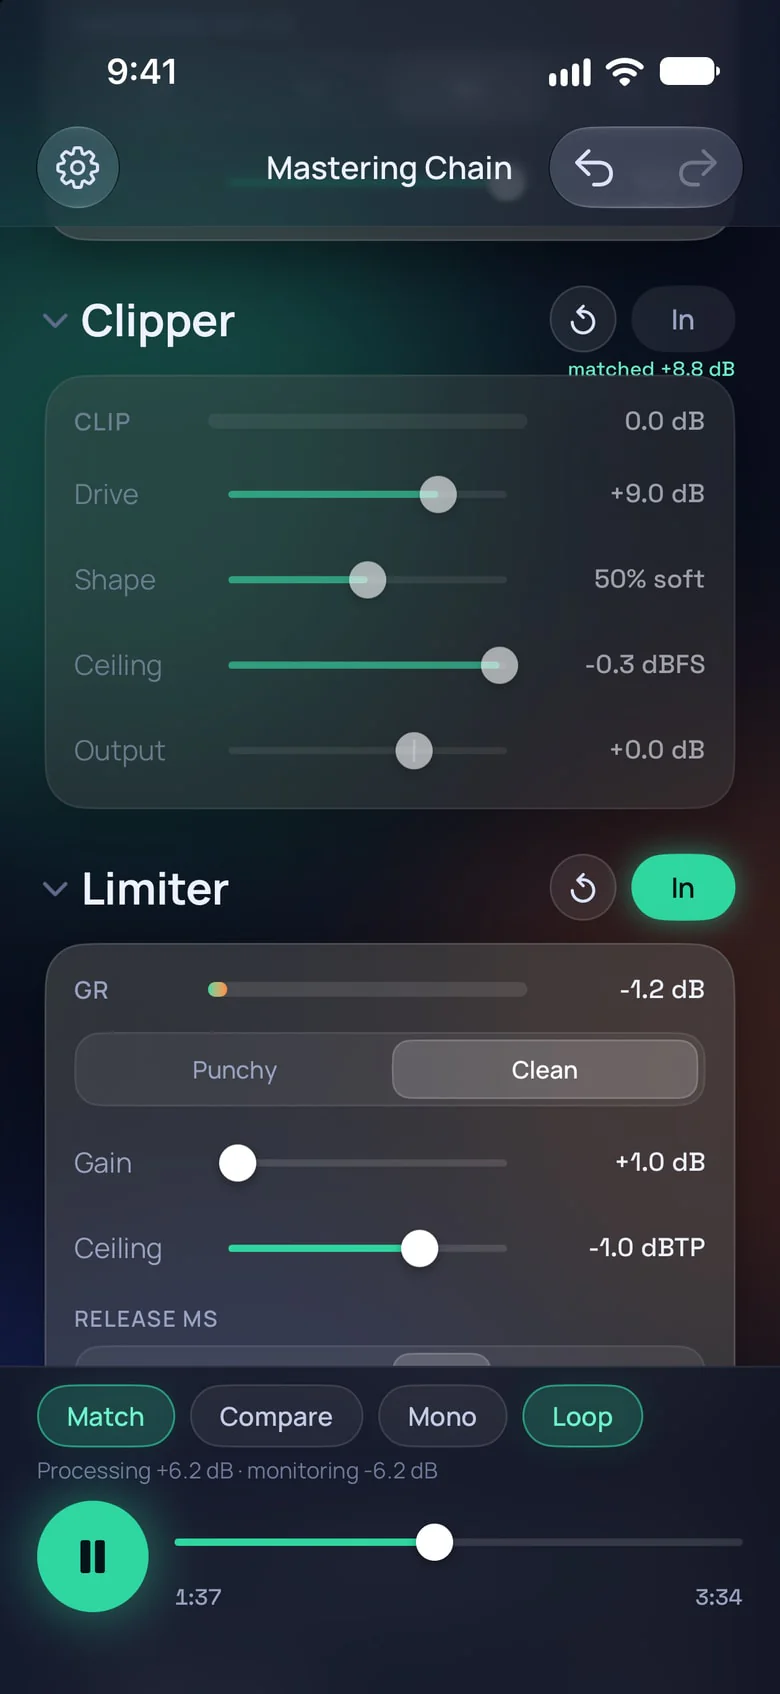
Four ways to listen, along the bottom. None of them changes the master or the export. Match and Compare come with the full version; Mono and Loop are free and stay on until you switch them off.
A block that's out. Here the clipper: its In is off and its controls are dimmed.
Matched. With Match on, a block that's out plays as loud as it did in: here the clipper made the track 8.8 dB louder. So you hear what it does to the sound, not that it's louder.
Match. Keeps every comparison at the same loudness. Turn it on, then switch blocks in and out, or use Compare.
Compare. Plays your mix instead of the master, in time, and says Original while it's on; the meter reads your mix meanwhile. With Match on, you hear it at the master's loudness, and the meter still shows its own.
Mono. Folds the sound to mono, to check that the kick, bass and vocal hold up on a phone speaker. Only for listening: the meters and the export stay stereo.
Loop. At the end, the track plays on from the start.
Processing and monitoring. With Match on: how much louder the chain makes the track, and how far the app turns everything down so the louder side never clips.
Export
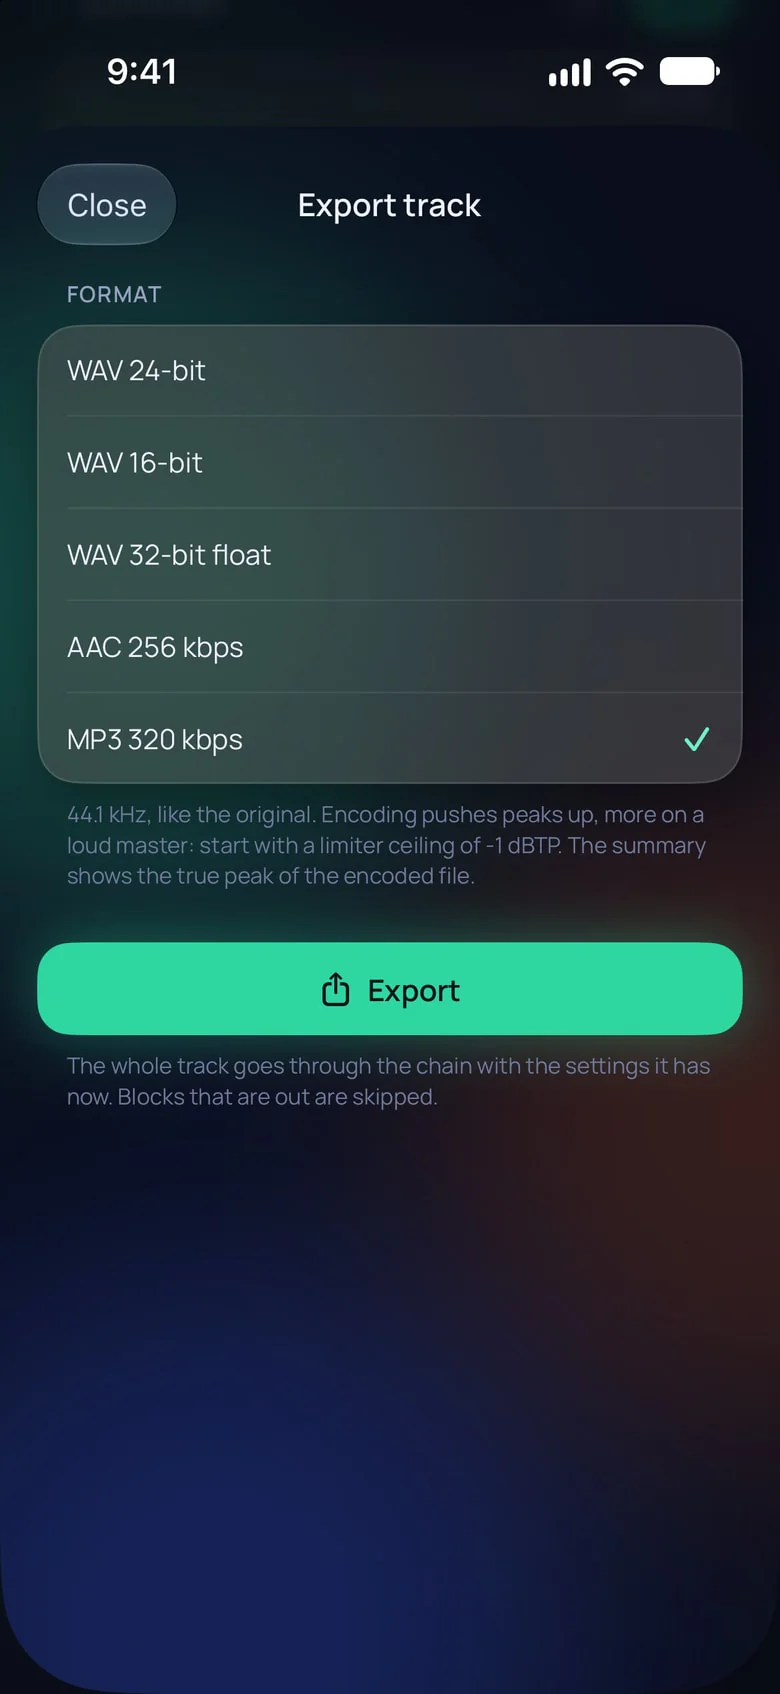
Export track renders the whole track through the chain as it's set now. Blocks that are out are skipped, and Match doesn't take part.
Format. WAV 24-bit for the master; WAV 16-bit for a CD or wherever 16 bits are asked for; WAV 32-bit float to keep it all for later; AAC 256 kbps or MP3 320 kbps to send around. The 16- and 24-bit WAVs are dithered, and your choice is kept for next time.
The note. The sample rate: the original's, or 48 kHz when AAC and MP3 can't take it. For AAC and MP3, a word on peaks.
Export. Renders the whole track: Processing…, then Writing…, with Cancel.
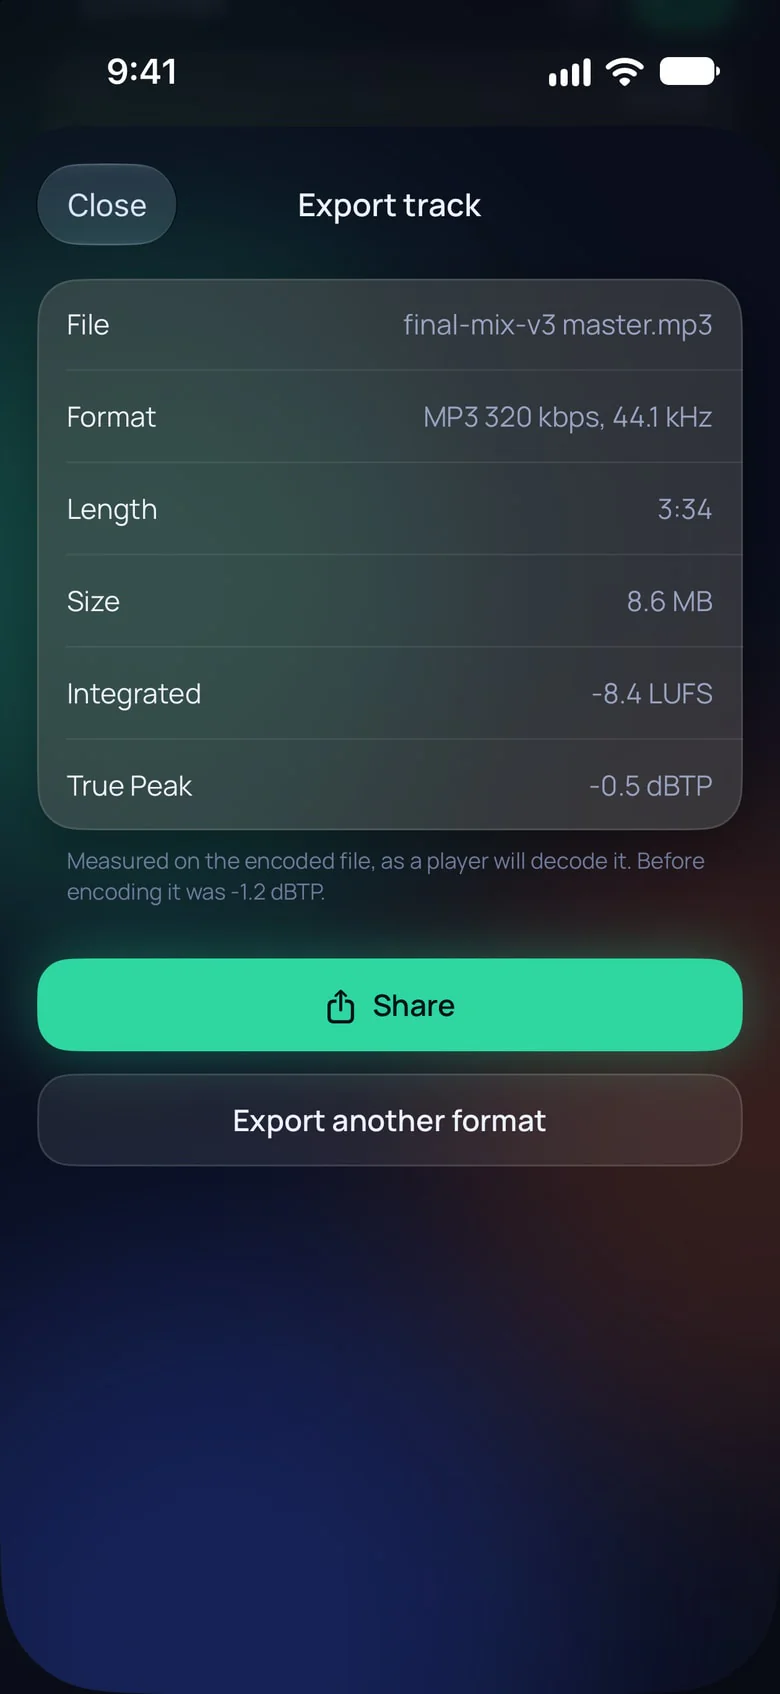
When it's done, the summary measures the file you'll share.
Why an MP3 peaks higher. Encoding to MP3 or AAC changes the wave a little, and its peaks come out higher than the master's, more on a loud master. Start with a limiter ceiling of −1 dBTP; if the summary shows a true peak over 0 dBTP, you can lower it and export again.
File. Your track's name with “master” added.
Format. With the sample rate. Length and Size follow.
Integrated. The loudness of the whole file.
True Peak. Measured on the file itself; for AAC and MP3, as a player decodes it.
The peak before encoding. For AAC and MP3: the master's true peak before it was encoded. When the file goes over 0 dBTP, it says so, and you can lower the limiter's ceiling and export again.
Share. To Files, AirDrop, Mail or a messenger.
Export another format. Back to the formats: an MP3 after the WAV, say.
The recipe
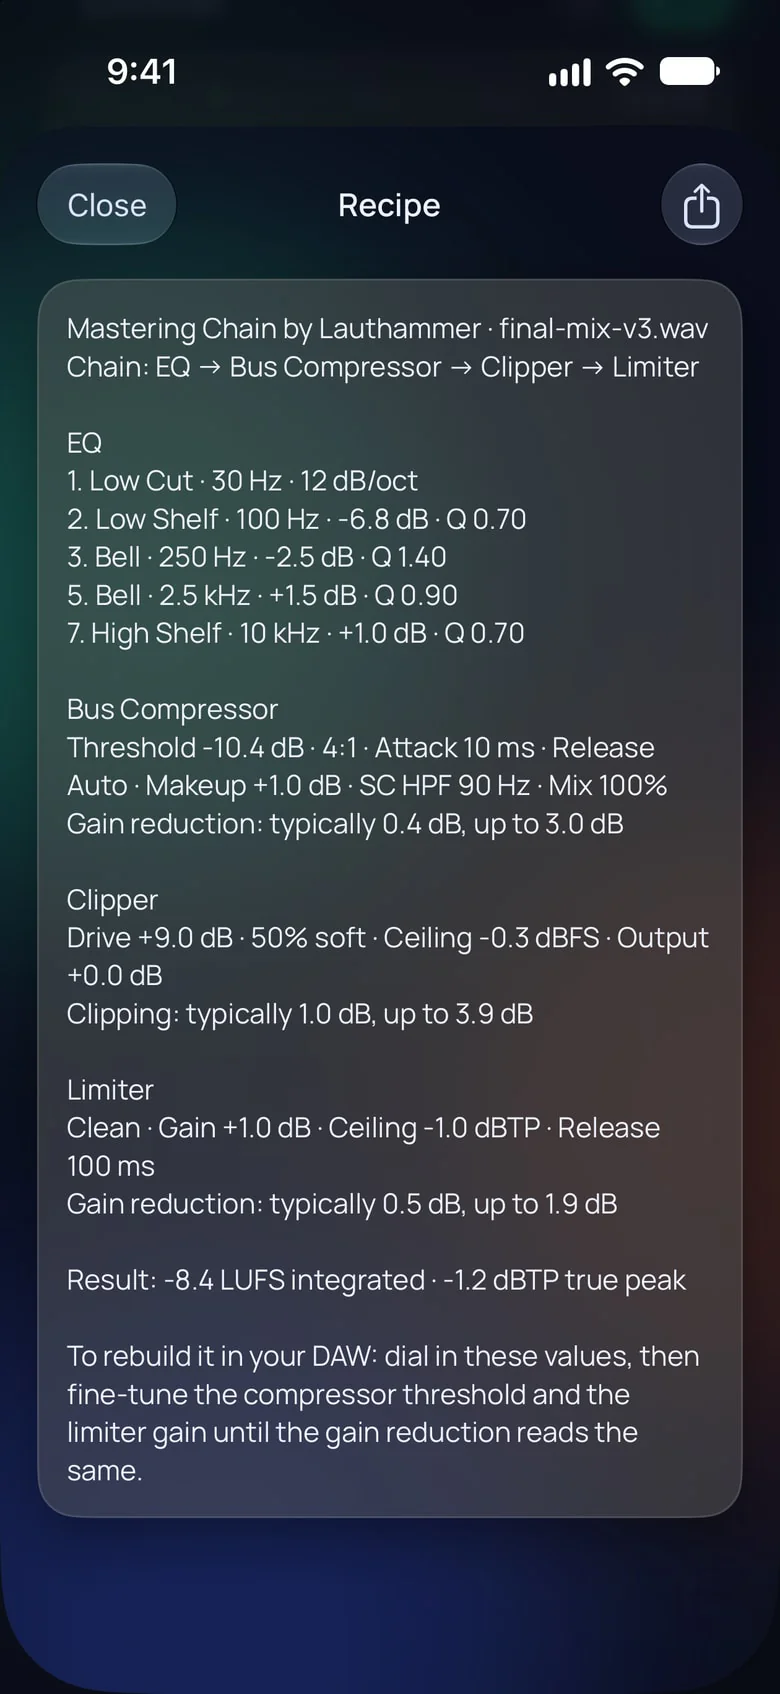
Recipe for your DAW runs the whole track through the chain to measure it, then writes the master down as plain text: every setting, and how much each block works. Rebuild it with your own plugins.
Share. To your computer, Notes or a messenger. You can also select the text and copy it.
The heading. The app and your track, then the order of the chain.
EQ. The bands that are on, by number, with their shape, frequency, gain and Q; a cut in linear phase says so.
How much each block works. Under each block's settings: typically and at most, over the whole track. A block that's out reads “out”.
Result. The master's integrated loudness and true peak.
How to rebuild it. Dial the values into your DAW, then fine-tune the compressor's threshold and the limiter's gain until your plugins take as much.
The full version and the free trial
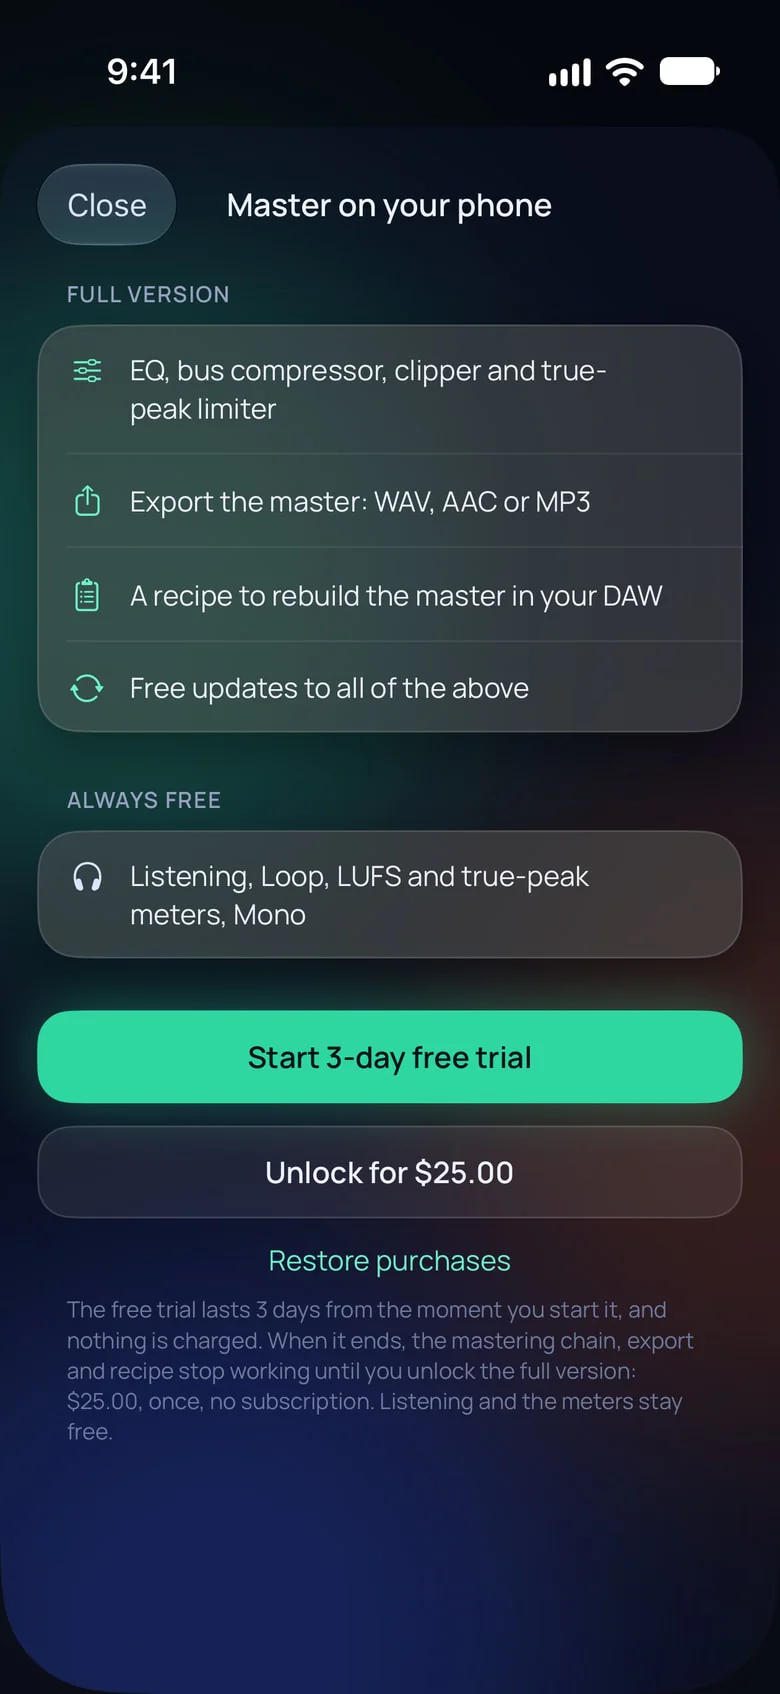
Listening and the meters are free for good. The chain, export and the recipe are the full version: try it free for 3 days, then unlock it once. Without the trial or the unlock, the chain is dimmed, and Export and Recipe open this screen, as do the banner above the chain and Settings → Unlock….
Full version. The EQ, bus compressor, clipper and true-peak limiter, export, the recipe, and free updates to all of them.
Always free. Listening, Loop, the LUFS and true-peak meters, and Mono.
Start 3-day free trial. The 3 days start when you tap it, and nothing is charged. A banner above the chain then shows the time left, with Unlock.
Unlock. One payment, no subscription: $15 plus tax in the US until November 24, then $25. The App Store shows the price for your country.
Restore purchases. Brings the full version back on a new iPhone with the same Apple Account. If it fails, tap Unlock: the App Store doesn't charge again for what you own.
The terms. When the trial ends, the chain, export and the recipe stop until you unlock. The chain stays on screen, dimmed, with your settings; listening and the meters stay free.
Settings
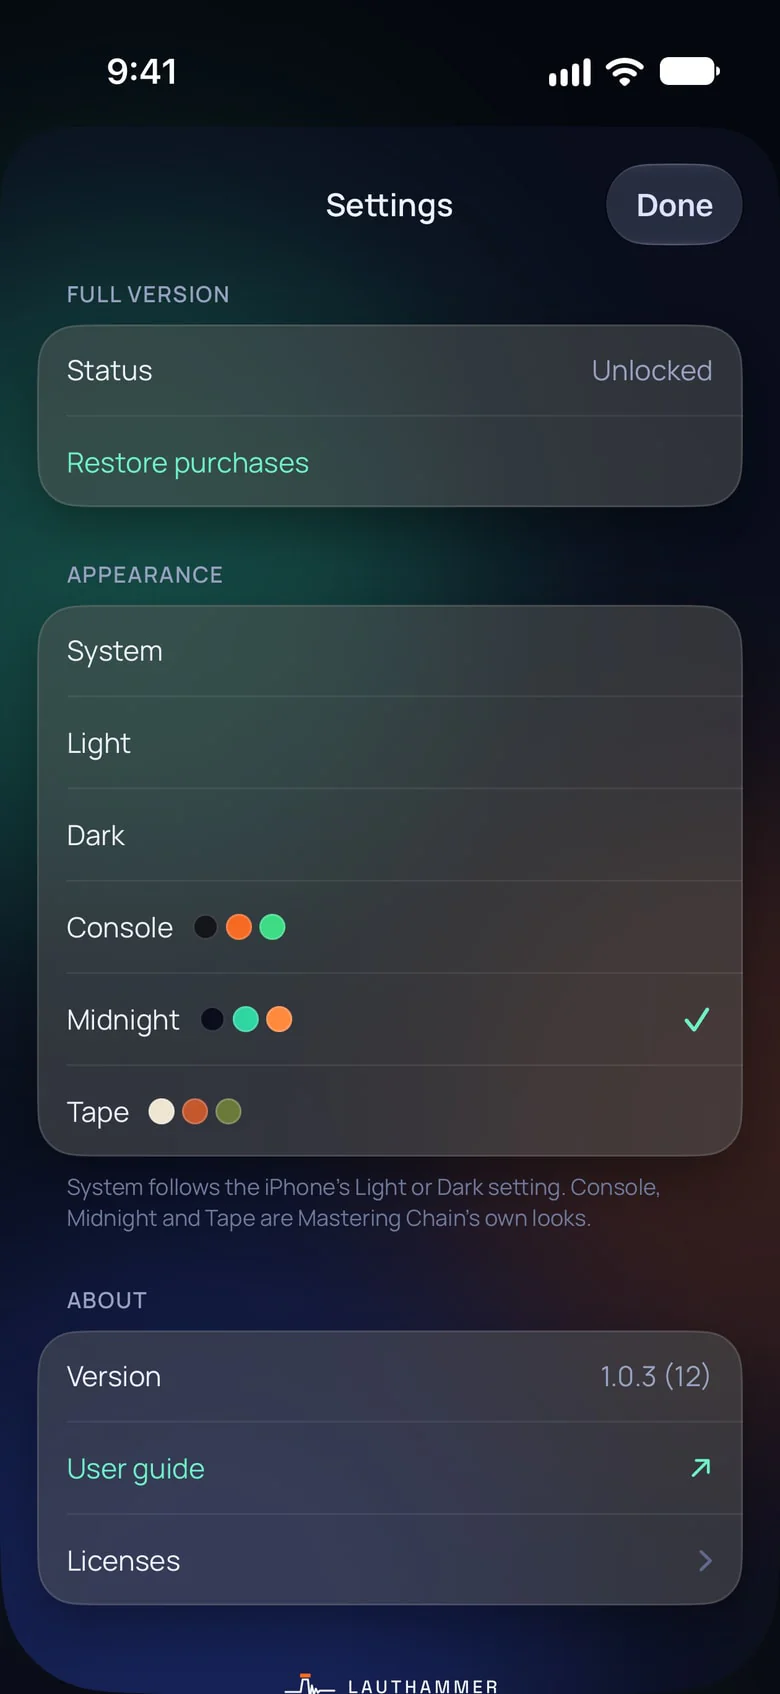
The gear, top left, opens Settings.
Done. Closes Settings.
Status. Free, the time your trial has left, or Unlocked.
Restore purchases. As on the trial screen. Until you unlock, Unlock… is here too.
Appearance. System follows your iPhone's Light or Dark; Light and Dark keep one. Console (graphite, orange and LED meters), Midnight (night blue glass and mint) and Tape (cream paper and a VU needle) are Mastering Chain's own looks.
Version. Which version you have. Handy when you write to us.
User guide. Opens this guide in Safari.
Licenses. The MP3 encoder, LAME, under the GNU LGPL, and the fonts of the app's own looks.
Headphones, AirPods, the car
AirPods and other Bluetooth headphones play the sound 150–250 ms late and compress it on the way. They're fine for balance and loudness; judge the top end and the timing on wired headphones. Under Audio output, the app says when you're listening over the air, and how late.
In the car, connect over CarPlay or a cable, turn Loop on and shape the low end while you listen: most tracks get played there.
The phone speaker. Turn Mono on and check that the kick, bass and vocal still come through.
Unplugging. When headphones come out or Bluetooth drops, playback pauses, so it never jumps to the speaker.
Calls and alarms pause playback; it carries on afterwards when iOS lets it.
Your tracks and data
Mastering Chain copies the track you import and works on the copy; your file stays where it was. Replacing the track deletes the old copy.
Everything stays on your iPhone: no account, no upload, and it works offline. The privacy policy has the details.
Still stuck?
Write to us: a person reads every message.